Tuesday, October 1, 2013

Beginning an install of HPOO


Hewlett Packer Operations Orchestration or HPOO as we will refer to it in this blog, is one of the premier automation technology in the IT industry.  With  HPOO almost anything that has a process can be automated using this technology.  The beauty of it is that it contains the ability to work seamlessly with almost any COTS technology in most IT shops.

The purpose of this blog is to show my journey to learn and become proficient with this technology.  As an IT consultant its important to not stay stagnant but prove yourself flexible and competent with a wide array of technologies.  Learning HPOO will keep me inline with this goal.

To begin I am going to use mysql express as the underlining database that will support HPOO.


Press next. Choose an authentication that you want for the database then select next.


Choose how you would like to allocate users.  I selected both options.


Choose how you would like to report errors to Microsoft.  Then press next.


Press install. And watch wizard.

Press next after the install completes.

Press finished

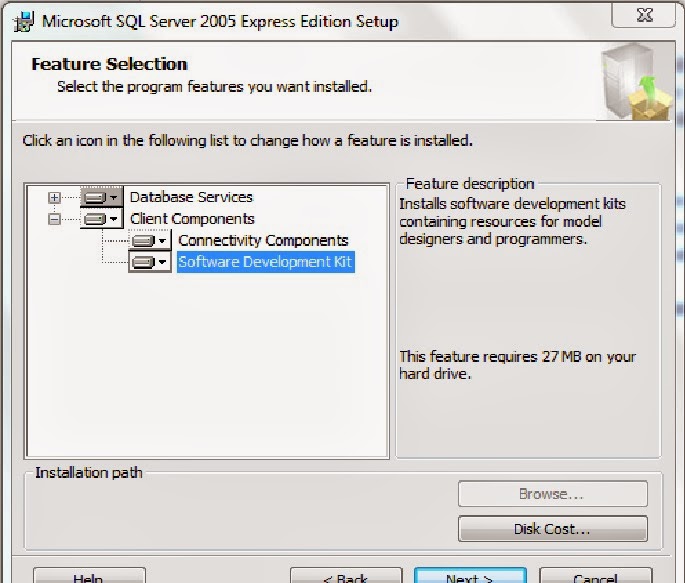
Now to install the actual sql express. Press the SQLServer2005_SSMSEE_x64.msi to install sql express. Enter your registration info and press next


Press next after you get to the management screen.


See the ready to install screen and press install.


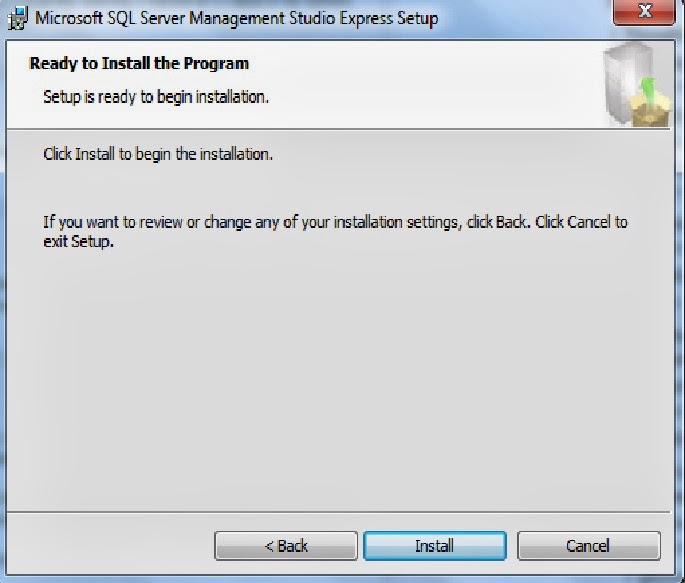
Once it is installed press finish.

Go to the sqlexpress program and right click databases folder and select new database.

Name it oodata and press ok.

Go to the sql server configuration manager and enable tcp/ip

At this point you have configured the database for HP OO.  Next is to install Central.

Navigate to the CentralInstaller64-9.00.exe and start it.


See the welcome screen and press next.


Accept the agreement and press next.


Review network settings change where need be and press next.


Select Microsoft sql server and press next.

Set the DB host, the port number, the database name (for this example we are using OOdata), the user, and the database user.  Also check create or recreate database schema?
Press next.

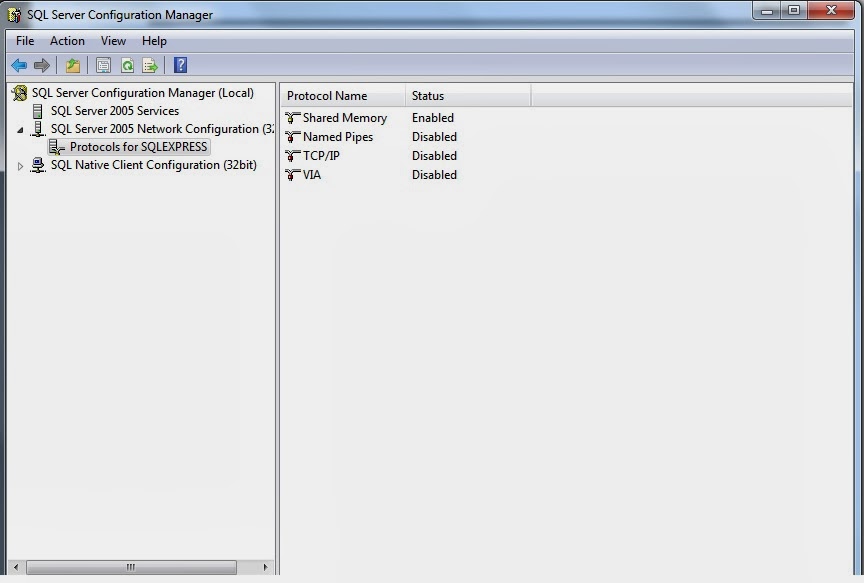
if you keep getting a connection refused and cannot telnet or connect to localhost port 1433 then you may need check out the mssqlserver logs and see what port is listed on the logs to see what it is running on.  In my case it was port 49161.  After you find the port try to use you  microsoft user for the machine name and press next again after you kill central and re run setup.

Found the logs here:

C:\Program Files (x86)\Microsoft SQL Server\MSSQL.1\MSSQL\LOG


It took me an extremely long time to get past this prompt. I ended up going into the icrosoft studio express, enabling the user sa and changing its password.  Restarting the database surver in the configuration studio. Once this was all done I was able to get to the following screen.


Create the password for the account admin that you will use by default to login into central. Press Next

Review the summary then press install.

Central is now complete press Finish.

You can verify the central install buy ensuring the HPOO tables are present in the oodata database in the microsoft sql studio.

There should be 27 tables plus the system tables folder.

In addition verify that RSCentral, RSJRAS, and RSScheduler have been created as services during the install of central.  To do that go to start type services.msc and look to see those services their.


To verify that Central is up type the following in your browser where hostname = server installed on

https://HOSTNAME:8443/PAS/

in my example it will be https://localhost:8443/PAS/


Here is what HPOO looks like once you log in.

Now to install studio.  Studio requires Central to be installed first before you can install it.
Find your installer StudioInstaller64-9.00.exe

Press Next.  Accept the agreement and press next.

Keep values as default and press next


Click the check box next to create a desktop icon and then press next


Review the summary and press install

Press Finish,


To login to studio use the same password you used for central.


This is the homescreen for studio


Saturday, August 31, 2013

Installing WebSphere 8.5 ND silently

Just a blog post of showing how I installed WAS 8.5 ND through a silent install. This post will go through the steps of gathering the correct files for WAS 8.5. ND for red hat linux.  Unziping the files,  doing a silent install of installation manager, and lastly creating a generic binary directory for WAS 8.5 ND. Not official just my notes on how I completed this process. Feel free to email me questions at info@jagtechllc.com

Installing Installation Manager


References:


get the installation zip file and unzip it

agent.installer.linux.gtk.x86_64_1.6.0.20120831_1216.zip


Create a directory for the Installation manager and place the zip file there

mkdir –p /opt/IBM/InstallationManager

mv agent.installer.linux.gtk.x86_64_1.6.0.20120831_1216.zip /opt/IBM/InstallationManager


Unzip the Installation Manager file


unzip agent.installer.linux.gtk.x86_64_1.6.0.20120831_1216.zip


Run the command to install Installation Manager Silently

  • Linux and UNIX as an administrator: ./install --launcher.ini silent-install.ini -log <log file path and name>

./install --launcher.ini silent-install.ini -acceptLicense -log /opt/IBM/InstallationManager/log/installlogfile.xml

Should get the following message

Installed com.ibm.cic.agent_1.6.0.20120831_1216 to the /opt/IBM/InstallationManager/eclipse directory.

Create a directory called WAS85ND to store all was85nd media files

mkdir –p /opt/IBM/WAS85ND

get the three WAS 8.5 nd zip and move them into the WAS85ND folder

total 5870328
-rwxrwxrwx 1 root  root       1085470611 Jan 17  2013 WAS_ND_V8.5_1_OF_3.zip
-rwxrwxrwx 1 root  root       1007221018 Jan 17  2013 WAS_ND_V8.5_2_OF_3.zip
-rwxrwxrwx 1 root  root        909965423 Jan 17  2013 WAS_ND_V8.5_3_OF_3.zip

Unzip all three zip files

unzip  WAS_ND_V8.5_1_OF_3.zip
unzip  WAS_ND_V8.5_2_OF_3.zip
unzip  WAS_ND_V8.5_3_OF_3.zip


The directory should look like this when you are done.


Create a response file to install WASv85.nd


Place the following in a response file.  This will create a binary profile one it is triggered through the installation Manager. Create this response file in the /opt/IBM/InstallationManger directory

<?xml version="1.0" encoding="UTF-8"?>
<!--The "acceptLicense" attribute has been deprecated. Use "-acceptLicense" command line option to accept license agreements.-->
<agent-input acceptLicense='true'>
<server>
<repository location='/opt/IBM/WAS85ND'/>
</server>
<profile id='IBM WebSphere Application Server V8.5' installLocation='/opt/IBM/WebSphere85/AppServer'>
<data key='eclipseLocation' value='/opt/IBM/WebSphere85/AppServer'/>
<data key='user.import.profile' value='false'/>
<data key='cic.selector.os' value='linux'/>
<data key='cic.selector.arch' value='x86'/>
<data key='cic.selector.ws' value='gtk'/>
<data key='cic.selector.nl' value='en'/>
</profile>
<install modify='false'>
<offering id='com.ibm.websphere.ND.v85' version='8.5.0.20120501_1108' profile='IBM WebSphere Application Server V8.5' features='core.feature,ejbdeploy,thinclient,embeddablecontainer,com.ibm.sdk.6_64bit,samples,liberty' installFixes='none'/>
</install>
<preference name='com.ibm.cic.common.core.preferences.eclipseCache' value='/opt/IBM/WebSphere85/IMShared'/>
<preference name='com.ibm.cic.common.core.preferences.connectTimeout' value='30'/>
<preference name='com.ibm.cic.common.core.preferences.readTimeout' value='45'/>
<preference name='com.ibm.cic.common.core.preferences.downloadAutoRetryCount' value='0'/>
<preference name='offering.service.repositories.areUsed' value='true'/>
<preference name='com.ibm.cic.common.core.preferences.ssl.nonsecureMode' value='false'/>
<preference name='com.ibm.cic.common.core.preferences.http.disablePreemptiveAuthentication' value='false'/>
<preference name='http.ntlm.auth.kind' value='NTLM'/>
<preference name='http.ntlm.auth.enableIntegrated.win32' value='false'/>
<preference name='com.ibm.cic.common.core.preferences.preserveDownloadedArtifacts' value='false'/>
<preference name='com.ibm.cic.common.core.preferences.keepFetchedFiles' value='false'/>
<preference name='PassportAdvantageIsEnabled' value='false'/>
<preference name='com.ibm.cic.common.core.preferences.searchForUpdates' value='false'/>
<preference name='com.ibm.cic.agent.ui.displayInternalVersion' value='false'/>
<preference name='com.ibm.cic.common.sharedUI.showErrorLog' value='true'/>
<preference name='com.ibm.cic.common.sharedUI.showWarningLog' value='true'/>
<preference name='com.ibm.cic.common.sharedUI.showNoteLog' value='true'/></agent-input>


Install silently using Installation Manager


Run the following command

./IBMIM -showProgress -input /opt/IBM/InstallationManager/WAS85NDresponse.rsp -log /opt/IBM/InstallationManager/logs/WAS85nd.log -nosplash -acceptLicense –silent

You should see a progress bar that will let you know where you are in the install
                 25%                50%                75%                100%
------------------|------------------|------------------|------------------|
............................................................................

Ensure that the install was successful


I did get what appears to be a spurious message that the packages were 32 bit not 64 I learned that wasn’t true. To prove that to be the case do the following.

Navigate to:

/opt/IBM/WebSphere85/AppServer/logs/postinstall/postinstall.log

Look at the bottom of the log for this message:

<message>INSTCONFSUCCESS: All config actions ran successfully with return code 0</message>

That indicates an successful install.

Also navigate to:

/opt/IBM/WebSphere85/AppServer/bin

And run 

 ./versionInfo.sh

The output should validate the packages installed and the version and system information.

[root@pnsnpgen2008 bin]# ./versionInfo.sh
WVER0010I: Copyright (c) IBM Corporation 2002, 2012; All rights reserved.
WVER0012I: VersionInfo reporter version 1.15.1.48, dated 2/8/12

--------------------------------------------------------------------------------
IBM WebSphere Product Installation Status Report
--------------------------------------------------------------------------------

Report at date and time August 6, 2013 5:26:48 PM EDT

Installation
--------------------------------------------------------------------------------
Product Directory        /opt/IBM/WebSphere85/AppServer
Version Directory        /opt/IBM/WebSphere85/AppServer/properties/version
DTD Directory            /opt/IBM/WebSphere85/AppServer/properties/version/dtd
Log Directory            /var/ibm/InstallationManager/logs

Product List
--------------------------------------------------------------------------------
ND                       installed

Installed Product
--------------------------------------------------------------------------------
Name                  IBM WebSphere Application Server Network Deployment
Version               8.5.0.0
ID                    ND
Build Level           gm1218.01
Build Date            5/1/12
Package               com.ibm.websphere.ND.v85_8.5.0.20120501_1108
Architecture          x86-64 (64 bit)
Installed Features    IBM 64-bit WebSphere SDK for Java
                      WebSphere Application Server Full Profile
                      EJBDeploy tool for pre-EJB 3.0 modules
                      Embeddable EJB container
                      WebSphere Application Server Liberty Profile
                      Sample applications
                      Stand-alone thin clients and resource adapters

--------------------------------------------------------------------------------
End Installation Status Report
--------------------------------------------------------------------------------